. . . the making of XC FS racing machine - STEREO . . .
EPIC, FUEL & GENIUS
Published Monday, February 26, 2007 by indrek.
Here is couple of pictures to illustrate the data of these suspension systems analyzed last week. All images are from Linkage dxf exports (with zero travel).
Specialized Epic
This is so called "four bar" - the most common multi-link design. I features a short swingarm located on a single pivot, with another pivot towards its end just before the rear wheel - making two pivots between rear wheel and frame. The shock can be operated by a further linkage or a series of linkages. The idea with a multi-link system is to get the rear wheel moving in a direction which cannot be offered by a single pivot system where the wheel moves in an arc around the main pivot. Trek Fuel
This is so called "faux bar". This suspension system is very similar to single pivot systems. With the wheel connected directly to the main pivot, faux are just a swingarm with a rocker driven shock. Performance depends entirely on where the main pivot sits in relation to the bottom bracket.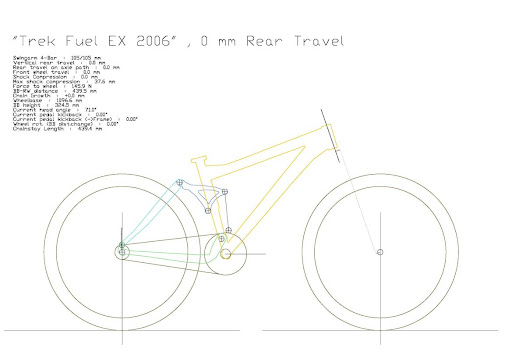 Scott Genius
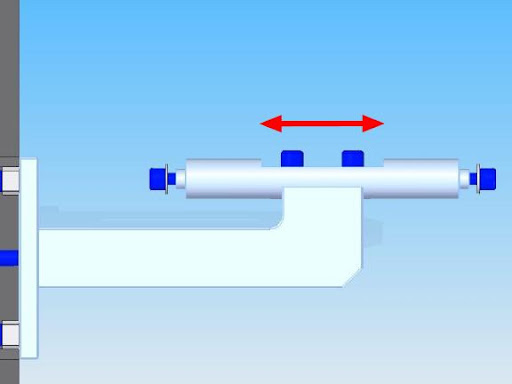
This is again a "four bar", but with a reverse shock.
 Later on I will be making analyzes of single pivot, virtual pivot & floating drivetrain systems...
Specialized Epic
This is so called "four bar" - the most common multi-link design. I features a short swingarm located on a single pivot, with another pivot towards its end just before the rear wheel - making two pivots between rear wheel and frame. The shock can be operated by a further linkage or a series of linkages. The idea with a multi-link system is to get the rear wheel moving in a direction which cannot be offered by a single pivot system where the wheel moves in an arc around the main pivot.
Trek FuelThis is so called "faux bar". This suspension system is very similar to single pivot systems. With the wheel connected directly to the main pivot, faux are just a swingarm with a rocker driven shock. Performance depends entirely on where the main pivot sits in relation to the bottom bracket.
Scott GeniusThis is again a "four bar", but with a reverse shock.
Later on I will be making analyzes of single pivot, virtual pivot & floating drivetrain systems...SUPPLIERS
Published Wednesday, February 21, 2007 by indrek.FRAME FIXTURE part 3
Published by indrek.
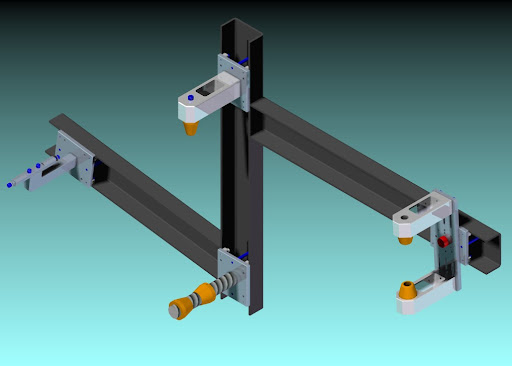
The fixture consists of three 100x50x5mm steel U-profiles, which are welded together. Each part that holds any of the tubes is made of a 10mm steel plate and two small steel blocks (connected via bolts and pins) to keep the plate in place. Two M8 bolts hold each of the steel plates and let them slide inside the U-profiles.
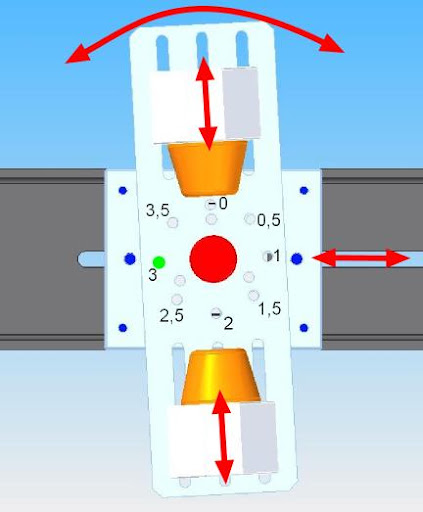
This part holds the head tube. The orange cones can be adjusted to fit different length tubes. The head angle is changed by inserting the green pin into the correct hole (8 different settings). And the whole thing can be moved to the length of the top tube.
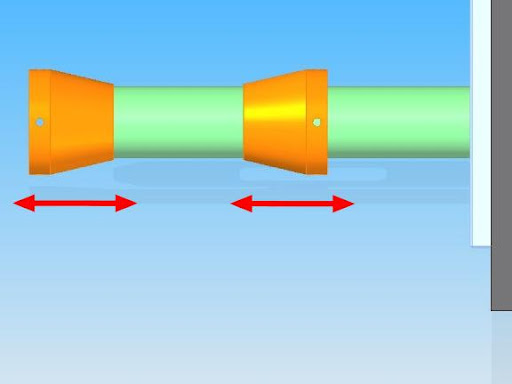
 This part holds the upper end of the seat tube. The orange cone goes into the seat tube and the whole thing can be adjusted to fit different seat tube lengths.
 This part holds the bottom bracket. The bottom bracket slides on to the threaded axle and the orange cones are then screwd to tight fit. Again the whole thing can be adjusted to fit the correct bottom bracket height.

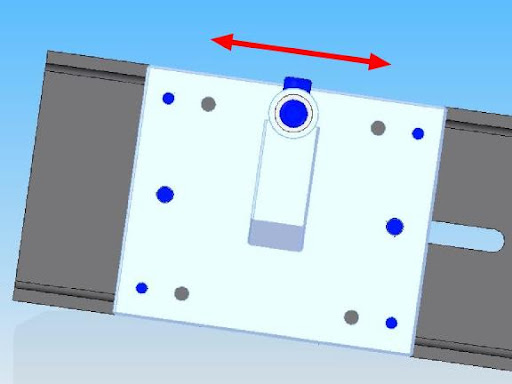
 This is the holder for the rear axle. It can be adjusted to the correct chain stay length and if necessary slightly moved sideways.
This part holds the head tube. The orange cones can be adjusted to fit different length tubes. The head angle is changed by inserting the green pin into the correct hole (8 different settings). And the whole thing can be moved to the length of the top tube.
This part holds the upper end of the seat tube. The orange cone goes into the seat tube and the whole thing can be adjusted to fit different seat tube lengths.This part holds the bottom bracket. The bottom bracket slides on to the threaded axle and the orange cones are then screwd to tight fit. Again the whole thing can be adjusted to fit the correct bottom bracket height.This is the holder for the rear axle. It can be adjusted to the correct chain stay length and if necessary slightly moved sideways.
ANALYZING DATA
Published Tuesday, February 20, 2007 by indrek.
Here is some data gathered from Linkage's simulation of three frames: Specialized Epic, Scott Genius and Trek Fuel. These three frames are among the best FS XC frames there are. They have had very many excellent reviews from different magazines and form hundreds of riders throughout the wolrd. As well have these frames been ridden to podium places in World Cup cross country races and in different marathons.
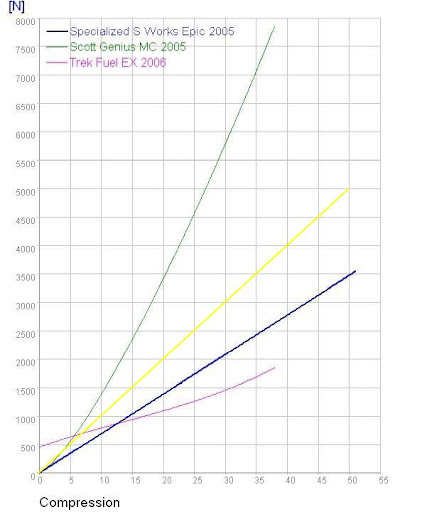
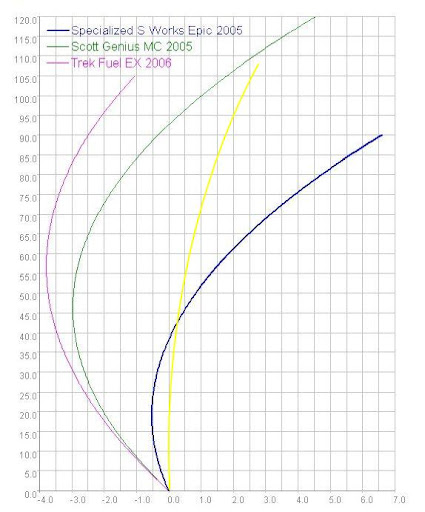
NB! The yellow lines show the "perfect" suspension design!
First is the geometry diagram. This shows the relationship between the actual rear wheel travel and the shock compression. Thick line shows the how much the rear schock compresses with the vertical travel of the rear wheel. Thin line (gradient) shows the progressivity of the travel.

Chain growth. This shows the change in the chain length throughout the travel.

Forces. The Linkage calculates the realtion between vertical forces acting to the rear wheel and the shock compression that it causes. The gradient of this shows the real progressivity of the suspension. The characteristics of a shock paly a big roll here.

Skock curve. This graph shows by how much force the shock reacts to compressing it.
Magnified axle path. This shows how the rear wheel moves through the travel in a coordinate system.
Pedal-kickback. This shows the pedal kickback. It is dependant on the chain growth.
NB! The yellow lines show the "perfect" suspension design!
First is the geometry diagram. This shows the relationship between the actual rear wheel travel and the shock compression. Thick line shows the how much the rear schock compresses with the vertical travel of the rear wheel. Thin line (gradient) shows the progressivity of the travel.
Chain growth. This shows the change in the chain length throughout the travel.
Forces. The Linkage calculates the realtion between vertical forces acting to the rear wheel and the shock compression that it causes. The gradient of this shows the real progressivity of the suspension. The characteristics of a shock paly a big roll here.
Skock curve. This graph shows by how much force the shock reacts to compressing it.
Magnified axle path. This shows how the rear wheel moves through the travel in a coordinate system.
Pedal-kickback. This shows the pedal kickback. It is dependant on the chain growth.
WHERE THE MAGIC HAPPENS
Published Friday, February 09, 2007 by indrek.
From 8:00 to 17:00 (or to 21:00 next few months:) this is my home!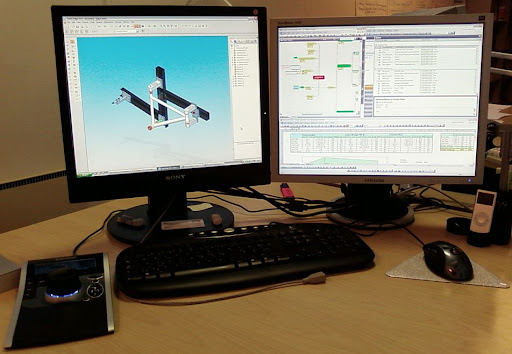
FRAME FIXTURE part 2
Published Thursday, February 08, 2007 by indrek.
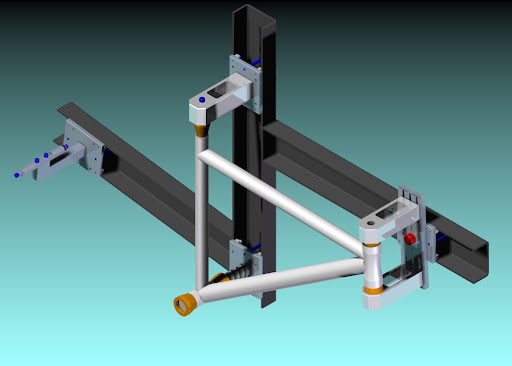
This is how the final rig should look like...
 It has all the necessary adjustments (head angle, top-tube length, seat tube length, seat angle, BB height and chain-stay length) so it should work just fine. I tried to do the construction as rigid and as simple as possible. The main frame is made form steel U-profile, joined by welding. Each part that's connected to bike frame has sliding blocks for the adjustments. Head angle can be varied by 0,5 degrees from 69,5 to 73 by inserting the steel pin to the correct hole...and so on... More detailed description to come...
For a mean while here are some more pics...

It has all the necessary adjustments (head angle, top-tube length, seat tube length, seat angle, BB height and chain-stay length) so it should work just fine. I tried to do the construction as rigid and as simple as possible. The main frame is made form steel U-profile, joined by welding. Each part that's connected to bike frame has sliding blocks for the adjustments. Head angle can be varied by 0,5 degrees from 69,5 to 73 by inserting the steel pin to the correct hole...and so on... More detailed description to come...For a mean while here are some more pics...
THE BABY IS BORN...
Published Sunday, February 04, 2007 by indrek.
A quick preview of the main frame... (done with Columbus Altec2 tubing)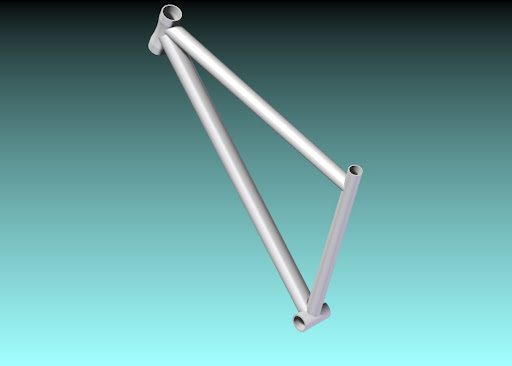
GEOMETRY
Published by indrek.
Based on a quick research and my own experience in different mountain bike frames I laid down STEREO's geometry. Keeping in mind that STEREO is purely a light and fast XC bike, I came up with the following numbers:
 Steep head and seat angles are for fast, tight and responsive handling/turning and for better climbing abilities. I've ridden a bike with exactly the same parts but with different frames (the main difference was in head and seat angles) and I definitly liked the frame with steeper angles a lot more. Wheelbase and chain stay length may be changed when the actual suspension design is laid out, but the main triangle should stay as it is... The frame is supposed to have 80-100 mm of front and rear travel and the geometry should consider the sag as well!
Steep head and seat angles are for fast, tight and responsive handling/turning and for better climbing abilities. I've ridden a bike with exactly the same parts but with different frames (the main difference was in head and seat angles) and I definitly liked the frame with steeper angles a lot more. Wheelbase and chain stay length may be changed when the actual suspension design is laid out, but the main triangle should stay as it is... The frame is supposed to have 80-100 mm of front and rear travel and the geometry should consider the sag as well!
FRAME FIXTURE
Published Saturday, February 03, 2007 by indrek.
I started thinking about the supporting frame or the rig for welding the actual bike frame. It is commonly known the very much of the frames quality depends on the quality of the weldment. So there is deffinitly a need for a good frame fixture. This tast will not be easy as there is a need for quite small tolerances and the structure itself must be very rigid. I'm also trying to make this an adjustalbe construction so that the head and seat tube angles and lengths may be changed. Although as I am building a FS frame, I'm beginning to think that I only need this rig for the first part of the frame (for welding the head tube, top tube and seat tube) because the rear end will be linked through pivots, so no welding there. On the second thought it may become to building a totally new rig for the rear triangle.
I searched the web for the rigs but all I came up was company called Anvil Bikeworks. The rigs they make are very beautiful work of art but I am definitely trying to make a much simpler and cheaper rig, but with all the necessary adjustments. So no place to copy:) Must deign everything by myself. I just need to see that I don't waste too much time and energy on it as this is not the main topic...
Here is a little preview what I have already made, but it has too many faults, so I must redesign...
TUBES
Published by indrek.
Here are my tables and charts of the different tubes.


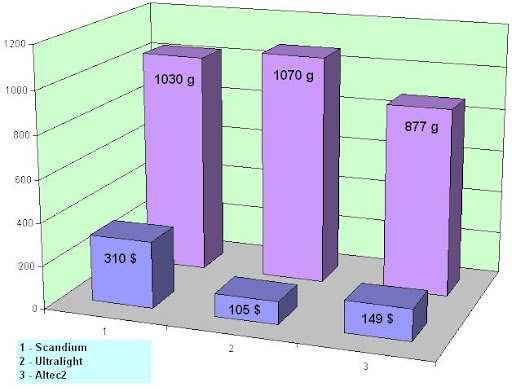
As it can be seen the Columbus Altec2 has far the best weight/price ratio. It is the lightest and twice as affordable as Easton Scandium. So at this point STEREO is going to be built with Columbus tubing. I am not going to take into account the properties of these three tube sets as they are commonly used by bicycle manufacturers so there should be no problem with quality, strenght or stiffness. Both Easton and Columbus suggest to use these tube sets in mountain bike frames so I am not going to be calculating any stress, strength or stiffness factors. Also the welding process is about the same on Ultralight and Altec2 and mor complicated on Scandium so again all points to Columbus. Finishing can be done same ways on all three tube sets, so this is no factor here.
Of course if in any point there will come up any problem with the Columbus, then it may be concidered to use the Easton tubes.
MATERIAL
Published Friday, February 02, 2007 by indrek.
Firs of all, I'm not yet sure which tubing to use and as I've been searching for suppliers, it seems that my choice will be quite limited. The dream would of course be to make the frame, or at least the front triangle out of carbon, but this is a mission impossible, as the carbon is so expensive and difficult to manufacture. So actually my only possibility is aluminium. I thought about titanium, but it just doesn't feel right, plus its too heavy for STEREO. Only considerable supplier I managed to find was Novacycles from US. They seem to be suppliers for individual frame builders and they also deal with Easton and Columbus tubes, which are 2 most known tube manufacturers. I have not yet contacted them (regarding whether they deliver to europe), but I'm fairly sure that this is THE place for my raw material. So my final decision has to be whether to make the frame out of Easton Scandium, Easton Ultralight 7005 Al or Columbus Altec2. The Easton scandium tubing has been used successfully by many top end manufacturers, but mostly only in hardtail frames. The Scandium would be my first choise, as it is lighter than 7005 Al, but at this moment I'm not sure whether it will hold up in a FS frame (I already see a riders weight limit about 85kg). Also the negative aspect about scandium is the complexity of the welding as there are a need for a special welding rods, cooling owes and so on. Thankfully both Easton and Columbus have a quite thorough description on their website regarding the welding and cooling procedures. At the moment I am heading to the Altec2 direction, but time will tell...
I will be doing a comparison chart for weights and prices soon because I need to decide the tubes I'm going to use before I can start modeling the frame.
I will be doing a comparison chart for weights and prices soon because I need to decide the tubes I'm going to use before I can start modeling the frame.
Linkage v2.5, FS-kinematics, ProE & Solid Edge
Published Thursday, February 01, 2007 by indrek.
For the simulation of the kinematics of FS frames, I purchesed a special software Linkage v2.5. This is the easiest and most used program for measuring different characteristics of a FS frame so I will be useing it to compare some high-end frames at the market today (Scott Spark and Genius, Specialized Epic, Trek fuel and so on...). The goal is to collect as much valuable data as possible without the actual frames. Based on the results I will then start designing STEREO.
I also managed to find another interesting software - FS-kinematics, but I am not yet 100% sure whether I will use this in my project. But at a first glance it seems really intriguing (as it seems german magazine Bike also uses this for their bike test).
As for the actual modeling and drawings, I will use either Pro/Engineer Wildfire or Solid Edge 18 and if necessary ANSYS in force calculations. The Pro/E vs. Solid is still open, but as my everyday work is done in Solid Edge it will be much more convenient to use it also in my project. Though I must admit my heart belongs to Pro/E:)
PROJECT
Published by indrek.
Here is a little preview of a map about STEREO (made in Mindjet Mindmanager PRO). This is i'm trying to run the project. There are also some general topics about mountainbikes for my school work. I am also quite sure the layout will change, so whenever any of the tasks there are completed or changes to the map made, I will post an updated one.

Also I figured out the name for my frame - STEREO. It's simple, catchy and easy to remember, plus connected to the design (full suspension frame - stereo as hardtail - mono...) Should be good enough!
PS! This doesn't mean I will not change the name during the process if needed:)
PS! This doesn't mean I will not change the name during the process if needed:)
POINT
Published by indrek.
This blog is all about building a full-suspension mountain bike frame for XC racing. Goal - to design and hopefully manufacture the frame before 01.05.2007 as this is the deadline for my bachelor thesis.
